
Glass. It's captivating. It's mesmerizing. Attempted by many; mastered by only a few. It can be a harsh teacher. Working with it is exhilarating and humbling. It requires planning and intense concentration, while at the same time also requiring one to being open to the serendipitous. It's unmatched and worth every effort.
These are the reasons that we choose to work in it and the reasons that we chose it for this project and also for the Celestial Winds Blown Glass Mobiles. Even though we would be dealing with elements that have more mass than that of other materials, the look of it, how it reflects and refracts light, and the simple knowledge that it is glass make the choice an easy one. Working with something that you cannot touch, except only indirectly, has an appeal. It is a degree of difficulty a magnitude above and the results are rewarding, to say the very least.
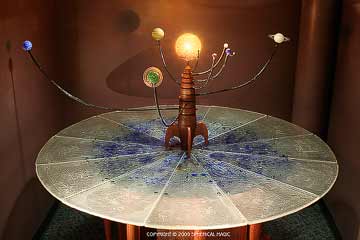
Our original approach for the orrery glass "table top" (we call it that to identify it but it is not a table) was to use a normal, garden variety beveled edge, well... table top from a local glass supplier. Their quote to cut a six-foot circle, bevel the edge and bore a 2" (50.8mm) hole in the center was just plain stupid. We looked at the Starfire table that they had in the showroom and, even though Starfire is more clear than standard glass, it still is green. Get a section of glass up to .5" (12.7mm) thick and the green becomes a serious drawback. It was right there at the counter that the path was clear (not to make a pun). The glass that we work in all the time in our glass blowing is crystal—colorless—unless we specifically add color to it.
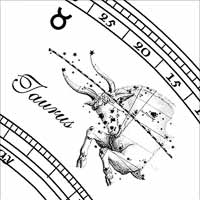
Our design was to etch the constellations of the Zodiac into the lower surface of the single glass top with a 2" hole bored in the center. Thinking out of the box; does it have to be one round of glass? We have glass casting capability. If we change the design and cast twelve sections that will make up the whole circle, each can hold one constellation and it will be way better than plain ol' green glass you can get anywhere! We can even introduce colors if we want—where we want—something not possible with a sheet of plate glass from a glass shop.
We had recently added a large kiln to the kiln room to be able to produce the Crystal Towers at Red Cloud; illuminated towers of cast glass, some 38.5 feet (11.73m) tall, that look as if they are constructed of rock that has become transparent; with all of the surface textures and inclusions found in natural minerals of various types. Developing this technique required quite a bit of ingenuity and effort and will be the subject of another post or three, because it is a whole story in itself. But, with casting 2" thick transparent rock under our belt, casting large plates a half-inch thick is in the bag; if the new kiln is big enough. We immediately returned to the studio to see if the big kiln could produce a 30° pie section three feet long. It fits! YES! Time to make a mold.
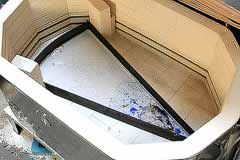
304 stainless strips were machined and shaped to form the pie wedge we needed; which just fit into the kiln with enough room around the sides to stay away from the elements.
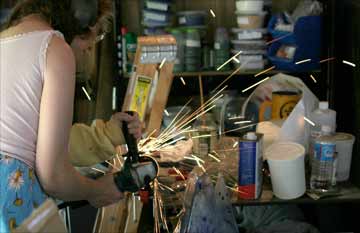
Dontcha just love a babe wielding power tools?
Then weeks of trial and error were invested to find the technique required to produce the plates. Initially, they all cracked during the annealing phase. That normally takes 12-15 hours. Evidently, we didn't have the temperature ramp correct for a plate of these dimensions and the glass was cooling too fast. Essentially, what you are doing is cooling the molten glass at so boring a rate that it doesn't realize what is going on until it's 'frozen'. The blocks we cast for the Crystal Towers were way thicker at 2"-3" (50.8mm-76.2mm) but not as wide/long at between 3"-7" (76.2mm-177.8mm) each dimension, so the temperature from center to edge was more uniform throughout the cooling phase and stresses didn't build up. At 19"x36"x.5" (.48m x.91m x12.7mm), these needed a different cooling profile. Finding it took some time.

Kiln Ready to Fire
Firing and Annealing Complete
We eventually arrived at each firing taking three days: two to three hours setting it up, preparing the mold, cutting and fitting the sacrificial blanket, loading the cullet and colors, fourteen hours firing to 1,850°F (1,010°C) and the remaining time following a slow ramp cool down, with a sudden flash (quick temperature drop) at the right point that retains the top glossy surface. As you can see, a lot of time and effort went into this.
The results are worth it. The image below left is eleven of the plates as they came out of the kiln. The twelfth is still cooling at the time of this shot. The image to the right shows the plates with the cold-working nearly complete. The plates have been sized, the edges ground and polished but the 2" center hole to clear the rocket tubes has yet to be cut. They all have been core drilled to accept the bolts that will hold them in place. Drilling glass is a delicate operation. Has to be done with a water-cooled diamond drill and ya gotta do it sssslllllooowwww. Thirty-six holes had to be drilled. Two plates broke in two during the operation and had to be re-cast. This ain't like fallin' off a log. If anyone thinks otherwise, they're welcome to try.
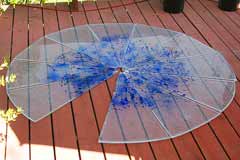
Eleven Plates Ready for Cold-working
Core Drilled and Edge Finished
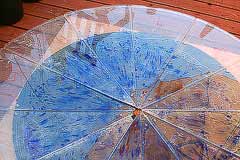
Once these operations were complete, the reverse etching of the Zodiac constellation drawings, stars and ecliptic could commence. Fortunately, the blasting cabinet was just large enough to accept the plates; just as the kiln was to make them. But the etching proved to be a challenge for another reason. The bottom surface was cast to look like raw ice sliced from a comet nucleus; which was wildly successful in the way that it looked. However, this now presented a problem that took more than a week to overcome. The etching masks weren't sticking to the rough surface and we had to develop a way to get around that or we couldn't have the drawings we wanted on the plates. We tried heating the plates with the mask applied to soften it and then kneading it into the crevices. Worked some but pretty much a no-go. Tried spray adhesive under the mask but no matter how long we let it outgas before applying the mask it attacked the mask cover sheet, making it soft and it wouldn't blast away. Scratch that. After a few more false starts, I finally found a way to get the blaster to operate quasi-reliably under extremely low pressure, used only freshly developed masks and it worked.
The Crystal Zodiac Ice Plates
Next: Blowing the Sun and Planets (no, not up).


